Sunday, December 26, 2010

Truffles (4 Star)

I made truffles again this year (see this post for last year's info--recipes used, tempering, etc.). I did mostly the same thing, but I also tried something new. I'll tell you at the end of this post because I am saving the best for last.

Here are the combinations I made:

Milk chocolate center, dark chocolate coating, finely shredded, toasted coconut (unsweetened) on top:


Dark chocolate center, white chocolate coating, finely chopped, toasted almonds on top:


Cinnamon center (I used Hershey's cinnamon chips), dark chocolate coating, topped with cinnamon:
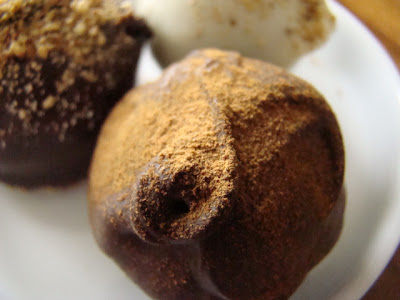


Butterscotch center (I used Guittard butterscotch chips), dark chocolate coating, topped with finely chopped, toasted almonds:


Mint center (I used Hershey's mint chips), dark chocolate coating, topped with crushed candy cane:
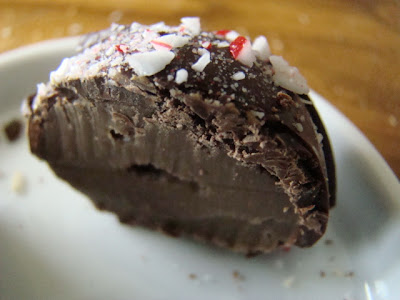


Mint center, white chocolate coating, topped with crushed candy cane:


The mint truffles were my second favorite. But my absolute-favorite-new-obsession-in-truffles-and-don't-even-care-if-I-ever-make-or-eat-any-of-the-others-ever-again (except the mint, of course) are these peanut butter truffles. Wow, they were so creamy, perfectly peanut buttery and chocolatey. If you like Reese's Peanut Butter Cups, these are ten times better.


I made two batches because I made the first batch incorrectly--I didn't read the recipe very carefully. Instead of first mixing the melted white chocolate and peanut butter together and then adding the cream I just dumped it all together and mixed. It didn't work very well because the white chocolate lumped together and wouldn't smooth out. I heated the whole mess up a little in an effort to smooth out the chocolate and it worked, but then the whole thing seemed greasy. Some of the oils separated out. However, it was still usable after being chilled, so I coated these with dark chocolate so that I could tell what was inside, and I topped them with roasted, salted, crushed peanuts. You can see this first batch pictured below. The middle is fairly compact and dense.


I made them a second time, this time following the instructions, and they were so creamy, dreamy, smooth, and fabulous. You can see in the picture below that they are a lot more fluffy than the truffles above.


Click here for the peanut butter truffle recipe.
Click here for the Pioneer Woman's truffle recipe (I used it for all the other centers).

Here are some things I plan to do next year:

=I'm going to chop the nut toppings in bigger chunks.
=I'm going to try mixing more coarsely chopped nuts into some of the fillings.
=I'm going to try mixing some fruits like dried cranberries into some of the fillings.

Any other ideas?

Sunday, December 19, 2010

Sunshine Golden Yellow Cake (4 Star)

I really like cake. Especially this cake. It is moist and fluffy and so far, my absolute favorite vanilla cake.


This recipe is from an old cook book of my mom's and I don't even know the name. But it's very old. Maybe it was my grandmother's to begin with. I've got to take a closer look at it the next time I visit.

I used to love making this cake when I was a child. Before I left home to go to college I copied down all of my mom's recipes onto 3 by 5 note cards that I wanted to take with me and this was one. I still love making it, but now I try to practice some restraint.

Isn't it lovely?


You want to know a secret? Most cake recipes that I have seen (probably this one included--though I don't have the book with me to check it out for sure--I didn't copy it word for word) instruct you to cool the cake before frosting it. Well, if you want a real treat, try frosting your cake when it is still warm, using homemade buttercream frosting. It may not be as beautiful to look at, but it will taste amazing because some of the frosting will melt and be absorbed into the cake like butter on warm bread. I can hardly write of it without jumping up and making this cake!


Sunshine Golden Yellow Cake

Makes one 13 by 9 by 2 inch or 2 9-inch rounds.

Grease and flour pans and preheat oven to 350 degrees.

2 1/2 cups flour
1 1/2 cups sugar
3 1/2 teaspoons baking powder
1/2 teaspoon salt
3/4 cups milk
2/3 cup butter, softened (The original recipe calls for shortening, but who really wants to eat that? Blech. I think this recipe works fantastically with butter.)
3 eggs
1/2 cup milk
1 teaspoon vanilla

Sift the dry ingredients together.

Add the 3/4 cup milk and the softened butter and cut together until combined and then beat for two minutes. The batter will be fairly stiff at this point but will become smooth and creamy.

Add the eggs, remaining milk, and vanilla and beat again for two minutes. The batter will become very fluffy.

Pour batter into greased and floured pan(s) and bake in the preheated oven for 30-40 minutes if using a 9 by 13 inch pan or 25-35 minutes if using 9 inch rounds. Cake is ready when it springs back to the touch or a toothpick inserted into the center comes out clean.

Cool and frost as desired (if you want it to look nice), or only cool until cake is still very warm and frost as desired (if you want it to taste even more amazing than it already does).

Saturday, December 4, 2010

Play Dough Cookies (4 Star)

These cookies are so fun for kids to help make. They are very easy to mix up, as easy to work with as play dough, and they hold their shape fairly well when baked. Although some of my boys were not so thrilled with them, saying they lacked flavor, which I agreed with. Next time I make them I think I will experiment--maybe more or different flavorings, lemon or orange zest, crushed candy cane, or something like that.


They did like the ones with chocolate chips and sprinkles. I think I should have mixed crushed candy canes into the candy cane cookies or even sprinkled them on top. They were still eaten quickly, though.


This is a basic butter cookie recipe from Prudence Pennywise. Click here to view.

Thursday, December 2, 2010

Candied Sweet Potatoes

There are two types of people in this world--those who like sweet potatoes, and those who don't. I feel sorry for the little lives of those who don't. I have assisted some to see the light. Maybe this post will help others.

To begin with, I must make sure that there is no confusion regarding yams and sweet potatoes. Yams are not sweet potatoes. If anyone tries to tell you otherwise, run the other direction. Yams = yuck. Sweet potatoes = fabulousness. In the store, if the sign says "yams" they are not sweet potatoes, they are yams. Do not touch them. If the sign says sweet potatoes, they are sweet potatoes. Buy them. Got it?

Candied sweet potatoes are my signature Thanksgiving dish. Mainly because everybody else thinks they don't like them and no one wants to eat them, let alone make them. But I love them and I must have them so I always make them for Thanksgiving. However, I have found that usually people think they don't like them because what they have had in the past and didn't like were actually yams. And if they were mashed up yams, the dislike will probably be even more intense. But in my family, while initially my sweet potatoes were eyed with mistrust and possibly revulsion, they are now a very popular dish. In fact, my sweet potatoes reached another milestone this year. My Dad, who is notorious for his picky eating, accidentally ate my sweet potatoes, not knowing what they were. His verdict was, "They weren't horrible." Coming from my Dad, that is a huge compliment.

Candied sweet potatoes are one of those dishes that is very similar to dessert but is served with dinner. I really like that kind of dish. This is why, as you may notice, there is a sea of toasted marshmallows on top. Toasted marshmallows are an excellent compliment to sweet potatoes. As are brown sugar, butter, and nuts. Give them a try--you may find out that they aren't horrible.


I never measure, so these are guesstimates. It's all to taste, anyway.

Candied Sweet Potatoes

about 3 lbs sweet potatoes (not yams!)
2-4 Tablespoons cold butter
1/4-1/2 cup brown sugar
1/2 cup chopped walnuts or pecans
1/2-1 cup mini marshmallows

Boil the sweet potatoes whole and unpeeled in a saucepan for about 15-20 minutes or until tender all the way through. Test with a fork. When done, rinse potatoes in cold water until cool enough to handle.

Preheat the oven to 350 degrees. Butter a 1 1/2 quart baking dish.

Peel the sweet potatoes and slice into 1/4-1/2 inch thick discs. Spread a layer of about 1/3 of the potatoes in the bottom of the baking dish. Sprinkle 1/3 of the nuts over the potatoes. Cut little slices of the butter and dot the potatoes and nuts. Sprinkle a Tablespoon or two of brown sugar on top. Repeat the layers so that you have three layers of sweet potatoes, nuts, butter, and sugar.

Cover the baking dish with a lid or foil and bake for 20-30 minutes, until sugar is caramelized. Remove dish from the oven, remove the lid or foil, and sprinkle the top with the marshmallows. Increase the oven heat to 450 degrees and brown the marshmallows for 2 minutes or until puffed up and golden. Check frequently to avoid burning. Serve immediately.

Cranberry Sauce (0 Star)

Homemade cranberry sauce is very easy to make and so flavorful. And beautiful. The gorgeous red color and the sweet-tart taste to complement the turkey is a Thanksgiving delight.


This recipe is also versatile. You can experiment with different flavors of juice, citrus zest, and different sweeteners. You can make it as sweet or as tart as you'd like. I used Pioneer Woman's recipe as a starting point but I didn't have maple syrup (though I'd like to try it that way). Here is what I did:

Cranberry Sauce

12 oz cranberries (one package)
1/2 cup frozen orange juice concentrate
1/2 cup water
2/3 cup brown sugar

Wash the cranberries under cold water and put into a medium saucepan. Add the rest of the ingredients and then stir. Turn heat to high and cook until it boils. Then turn the heat down to medium or medium low and simmer for about 10 minutes or until thickened. Remove from heat and cool completely before serving. Store in the refrigerator.

Click here for Pioneer Woman's recipe.

Tuesday, November 30, 2010

Deluxe Pumpkin Pie (4 Star)


It is time to say goodbye to the Thanksgiving pies, until next year. (Sniff.) This is the last pie I that I made. I made it on a whim because I had all my other pies made, but I had one more pie pan and some left-over crust--just enough for one more pie, and I decided I couldn't let it go to waste. I had seen this recipe and I had all the ingredients for it except for the gingersnaps for the gingersnap streusel topping, so I made a different topping. When I make this again, I will be sure to get the gingersnaps, because I think that would be even better than the streusel that I improvised.


This pie turned out really good, though not as popular as the regular pumpkin pies. (Of course not! Nothing can take the place of regular pumpkin pie--unless it's butternut squash pie:) It was much more rich and the pumpkin was less conspicuous with the other flavors, but the flavors were delicious together.


The original recipe was for mini pies, so I altered it to make one big pie. And the name was too long, so I shortened it. When people asked what kind of pie it was, I didn't want to have to say, "Cream Cheese and Butterscotch Pumpkin Pie with Ginger Streusel Topping." So here it is:

Deluxe Pumpkin Pie
(makes one pie)

1 unbaked 9-9.5 inch pie shell

Cream Cheese Layer
8 oz. softened cream cheese
1/3 cup granulated sugar
1 teaspoon vanilla

1/2 cup butterscotch chips

Pumpkin Filling
1/4 cup granulated sugar
1/4 cup brown sugar
2 eggs
1/2+ teaspoon cinnamon
1/2+ teaspoon nutmeg
pinch cloves
pinch ginger
pinch salt
1/2+ teaspoon vanilla
1/2 cup half and half or cream
1 cup canned or fresh pumpkin

Streusel Topping
1/2 cup all purpose flour
1/4 cup brown sugar
1/4 Cup chopped pecans
3/4 teaspoon ground ginger
1/4 cup softened butter

Preheat the oven to 350 degrees.

In a mixing bowl, beat the cream cheese, sugar, and vanilla until creamy. Spread on the bottom of the pie shell. Sprinkle the butterscotch chips in an even layer on top of the cream cheese.

Clean out the mixing bowl and beat the sugars, eggs, spices, salt, and vanilla on high speed until fluffy and stiff. Add the half and half or cream and the pumpkin and mix until well combined. Pour on top of the cream cheese and butterscotch chips.

Put the pie in preheated oven and set timer for 50 minutes. While baking, clean out the mixing bowl and combine all of the streusel ingredients except the butter. Mix until combined. Cut in the butter until it resembles coarse crumbs. After the pie has baked for about 50 minutes or until the filling is beginning to set, remove the pie from the oven and allow the filling to set for 10 minutes. Sprinkle the streusel on top and return to the oven and bake for another 25 minutes, until the pie is completely set and the streusel is golden. Remove from the oven and allow to cool completely before serving.


Thanks to Picky Palate and Prudence Pennywise for the original recipes. Click here and here to view.

Monday, November 29, 2010

Pecan Pie (0 Star)

This year I tried Pioneer Woman's pecan pie recipe. It was excellent. I love the gooey, caramel-y (I used that made-up word in the last post, too, didn't I?) middle with the crisp, nutty top.


Click here for the recipe.

Chocolate Chip Pie (4 Star)

Have you ever had chocolate chip pie before? If not, I highly recommend it. I tried making it for the first time two years ago and it has since become an important part of my pie repertoire. If you like fresh, homemade chocolate chip cookies, this pie is even better, I dare say. Serve it warm with a scoop of ice cream melting on top and it's caramel-y, chocolaty, nutty decadence will captivate your taste buds.


Click here for the recipe.

Bananan Cream Pie (0 Star)

Aaaahhh, banana cream pie--what a lovely thing! It is so hard to see these pictures and write about this when it is gone. I have banana cream pie hunger pangs.


This banana cream pie is the real deal. No boxed puddings here. If you had to eat banana cream pie made from boxed pudding with cool whip on top for Thanksgiving, I feel really sorry for you. (Yes, I am a banana cream pie snob.)


This recipe is from my paternal grandmother's file. I'm going to title it after her because that's what it has always been called to me.

Virginia's Banana Cream Pie
(makes one 9-9.5 inch pie)

1 pre-cooked 9-9.5 inch pie shell

2/3 cup granulated sugar
2 Tablespoons cornstarch
2 Tablespoons flour
1/8 teaspoon salt
2 cups milk
3 egg yolks (well beaten)
1 teaspoon vanilla
2-3 bananas
1 cup whipping cream
1/4 cup powdered sugar (or to taste)
1 teaspoon vanilla

In a medium saucepan, place the first four ingredients and whisk them together with a wire whisk. Add 1 cup of the milk and whisk until smooth. Add the remaining milk and the egg yolks and whisk again. Place the pan on a hot plate and turn the heat up to medium. (Being impatient, I usually start the heat on high until I begin to see a little steam coming from the milk and then I turn down the heat to medium. But you have to be careful not to scorch the milk.) Heat the pudding, whisking constantly, until it is very thick. You can heat it to boiling but it isn't necessary, as long as it has thickened sufficiently. It should be thick enough that it is not so easy to whisk. Remove the pan from the heat and add the vanilla. Stir it in until smooth.

Peel the bananas and slice them into the pie shell. Pour the pudding on top and allow to cool. Cover with plastic and place in the refrigerator until completely cold.

When the pudding is cold, whip the cream, powdered sugar (to taste), and vanilla until fluffy. I don't like it too stiff, but just barely getting stiff. Then spread it over the top of the pudding and chill until ready to serve.

If you are wondering, none of the boys care much for this except for eating the whipped cream off the top. Where did they come from?

Pie Crust (4 Star)

This is the pie crust recipe that I use for most pies except fruit pies. For fruit pies I love my mother-in-law's crust which I have posted here. But for most other pies that I make that need a normal flour and fat crust, this is what I like best. This recipe is from my mom's recipe file. The original recipe calls for shortening, but I just can't bring myself to use that stuff. It's like eating soft plastic.

Pie Crust

3 cups flour
1 teaspoon salt
1 1/4 cups cold butter
1 egg (beaten)
1 Tablespoon vinegar
4 Tablespoons cold water

Sift together the flour and salt. Cut the butter in with a knife or pastry cutter or pulse in a food processor until it resembles coarse crumbs. In a small bowl combine the egg, vinegar, and water. Pour the liquids into the flour crumbs and stir and knead with hands until it just barely comes together.

This recipe makes two thick bottom crusts or three thin. I like mine thick, so I use it for two. I pat the dough into a round disk and roll it between two pieces of wax paper. (I used to use my Pampered Chef silicon baking mat and it was awesome until it melted in the dishwasher. I loved that thing.) Once it is rolled I peel off the top wax paper and flip the bottom wax paper with the crust stuck to it and center it on the pie pan. Then I peel off the wax paper and gently settle the crust into the pan, cut off the excess with a knife and flute the edges.

I used this crust for all the pies I made for Thanksgiving this year. For the banana cream I pre-cooked the crust. I first pricked the inside of the crust all over with a fork, especially in the area where the bottom meets the sides. Then I lined the inside of the crust with a double thickness of foil, pressing it down firmly all over. Then I baked it in the oven, preheated to 450 degrees for 8 minutes. Then I removed the foil and baked for an additional 5-6 six minutes until golden.

Sunday, November 28, 2010

Pumpkin Pie (3 Star)

Thanksgiving is one of my favorite holidays. Gathering with family and eating a fantastic meal is enough to make me happy. Thanksgiving food is so comforting and tasty, and I especially look forward to the pie. This year I made several pies and will post all of the recipes I used. The humble pumpkin pie is one of the most popular at our gatherings and is one of my first picks.


I am a big fan of using fresh pumpkin, not canned in my pumpkin pies. I realize that takes a little more effort but to me it is very much worth it. The flavor is so much more fresh. And I have a little secret about my pies this year. I actually used pureed butternut squash. So I guess if you want to get technical, it wasn't really pumpkin pie. But I don't think anyone could tell the difference. At least if they could, nobody said so. I, personally, couldn't tell. If anything, it was better. I've actually been using butternut squash puree in the place of pumpkin in other recipes, too, just because I have a lot of it in my freezer.


This is from my mom's recipe file and I believe hails from her mother. I altered it a little by using half white sugar and half brown.

Grandma's Pumpkin Pie
(makes two pies)

2 unbaked 9-9.5 inch pie crusts

4 eggs
3/4 cups granulated sugar
3/4 cups brown sugar
2 teaspoons cinnamon
2 teaspoons nutmeg
1/2 teaspoon cloves
1/2 teaspoon ginger
1/4 teaspoon salt
2 teaspoons vanilla
1 large can of pumpkin or 3 cups fresh
1 1/2 cups of evaporated milk (one 12 oz can) You could use half and half or cream in place of the evaporated milk.

Preheat the oven to 425 degrees.

In a large mixing bowl, combine the first eight ingredients and beat until fluffy and stiff. Add the pumpkin and milk and mix very well. Pour the filling into the two pie crusts, dividing evenly. Bake for fifteen minutes at 425 degrees, then lower the temperature to 350 and bake for fifteen minutes more, until a knife inserted near the center comes out clean.

Allow to cool completely before serving (I actually like it better the second day) and serve with ice cream or whipped cream.

Monday, November 22, 2010

Southwest Chicken Chili (3 Star)

This is one of my favorite chicken chili recipes, from Picky Palate. It's spicy, savory, fresh, and healthful. I generally make it as written, with the addition of a cup of my favorite salsa.

Click here for the recipe.

Sunday, November 14, 2010

Spicy Cauliflower with Sesame (0 Star)


When I told Brandon I was making cauliflower for dinner, his response was, "Oh." But when he came home he was first wooed by the spicy, exotic smell, and then completely wowed by the delectable flavor of this dish. Cauliflower is probably normally considered rather boring, but in this, it is anything but. It was like a party in my mouth. I omitted the jalapeno and used red pepper flakes instead of the dried red chilies and it was plenty spicy for me.

I didn't even try feeding this to the boys. I guess sometimes I get tired of even trying.

Click here for this recipe on 101 Cookbooks.

Apple Cheddar Squash Soup (0 Star)


I couldn't believe that none of the boys liked this soup. (How often have I said this? Will I never cease to be amazed at their lackluster palates?) I really thought they would. I think I would have liked it at their ages. It was smooth and creamy and the flavor was mellow, earthy, and cheesy. I doubled this recipe and Brandon and I happily took care of it within a few days. And it was even better the second and third days. I didn't have any prosciutto or bacon so I used some smoked canned ham. Sorry if that sounds gross, but we still really loved it.

Click here for the recipe from Perry's Plate.

Wednesday, November 10, 2010

Chocolate Date Cupcakes (2 Star)

If you want a recipe for an extremely decadent, rich, chocolate cake, then click here. I made it once and it was chocolate magnificence, as the title indicates. When I made it I also made the mistake of calculating the calories contained therein, just because I was curious. All I have to say is, you don't want to know. I plan to reserve future makings for very special occasions.

However, I still wanted to be able to enjoy some moist, dense, chocolatey richness on any old regular day, so I decided to try to create something resembling this cake but also containing some healthful substances. I am far from expert in recipe creating, so I am sure that someone could easily improve upon this, but this is what I came up with. It fulfilled my desires in the moist, dense, and chocolatey categories, so I am fairly proud of myself. However, due to the fact that I used dates and fruit juice for a portion of the sweeteners, there is a bit of a different flavor which some of my boys were not fond of. This is why only two of my boys liked these. So, the resultant cake has a little less oil, a lot less sugar, whole grain flours, mousse and ganache replaced with a dusting of powdered sugar, and viola! Containing a fraction of the original caloric content these little chocolate satiated cupcakes are enough to satisfy a craving while imparting some antioxidants, vitamins, and fiber.


Chocolate Date Cupcakes

1 cup chopped, pitted dates
1/2 cup 100% white grape juice concentrate
1/2 cup low fat cottage cheese
4 ounces unsweetened chocolate squares
1/4 cup olive oil
1/4 cup granulated sugar
2 Tablespoons powdered sugar
2 eggs, beaten
1/2 cup whole wheat flour
1/2 cup oat flour
1/4 cup unsweetened cocoa powder
1/2 teaspoon salt
1/2 teaspoon baking powder
1/4 teaspoon baking soda

Preheat oven to 375 degrees.

In a small, microwave safe dish, microwave the grape juice concentrate on high for about a minute, or until it is hot. In a blender or food processor, puree the dates, grape juice concentrate, and cottage cheese until smooth.

In the same microwave safe dish used for the grape juice, microwave the chocolate squares on high for 20 seconds at a time, stirring in between, until melted and smooth. Stir in the oil, sugar, and powdered sugar. Pour into the blender or food processor along with the eggs and whir briefly, until smooth.

In a separate, medium bowl, put the flours, cocoa powder, salt, baking powder, and baking soda. Whisk to combine.

Pour the wet ingredients into the dry and stir until just combined. Pour the batter into a paper lined muffin tin, dividing the batter equally.

Bake in preheated oven for about 15 minutes or until cupcake centers spring back to the touch. Remove from oven and dust with powdered sugar.

Monday, November 1, 2010

Doughnuts (4 Star)

For Halloween this weekend I made two kinds of doughnuts. This first kind was Pioneer Woman's raised doughnuts and they were challenging. I think if I tried making them another time or two I might get them right. The dough was so soft that after they rose it was really hard to get them into the oil without mutilating them. I read that the key to light, fluffy doughnuts is a really soft, loose dough, but I think mine were too soft. Also, I think my oil was probably not the correct temperature, either, since I didn't have a thermometer. A lot of the first ones I made cooked too long so they were grease bombs. (Sorry if you ate one of these at my party!) The last few I made weren't so bad. Brandon's mom made the maple frosting and that was the best part about them, I thought. Anyway, I guess it was good for a first try.

Click here for the recipe.


The other kind I made were pumpkin doughnuts and they turned out really good.

Click here for the recipe.