Showing posts with label 4 star. Show all posts

Tuesday, June 21, 2011

Cider Braised Roast Beef in the Crock Pot (4 Star)

Most Sundays growing up my mom made roast beef with potatoes, carrots, and gravy for dinner. It was always one of my favorite dinners. I've struggled to learn to make my own because it often turned out dry and tough--the dual curse of inept roast cooking. I've finally figured out how to make a fall-apart tender, juicy, savory roast beef and the crock pot is the key. My mom used to always use the oven but that method has only caused me ruin and despair. If you, too, have struggled in your roast-cooking efforts, try this recipe.


Cider Braised Roast Beef

1-2 large onions, peeled and sliced
4-5 lb beef roast (cheap cuts work great in this recipe)
salt and pepper
4-5 carrots, peeled and cut into halves or thirds
6-8 potatoes, peeled and cut into halves
3-4 (or more) cups beef broth
1 cup apple juice concentrate
1 bay leaf
4 cloves garlic, chopped, smashed, pressed--whatever you prefer

This recipe is the kind that is very tweak-able. Use more or less of anything to suit your tastes.

Place the onion in the bottom of a large crock pot. Heavily salt and pepper the roast, rubbing it into the meat. Place the roast on top of the onion. Put the carrots and potatoes around the roast. In a large measuring cup combine the beef broth, apple juice concentrate, and garlic. Pour around the roast. The liquid should cover the roast at least half-way. Add more beef broth, if necessary. Add the bay leaf.

Put the cover on the crock pot and either cook on low for around ten hours, or high for 6-8. Crock pots can vary in temperature quite a bit so it could take more or less time. I like to start mine on high for a couple of hours and then turn it to low for the rest. The roast is done when it falls apart when pulled with a fork and the vegetables are tender.

Gravy

2/3 cup flour
2/3 cup water
1 teaspoon salt (or to taste)
1 teaspoon beef base (or to taste)

Remove all meat and vegetables from the pot and place on a platter or serving dishes. Cover while you make the gravy. You can either skim the fat from the top or make the roast a day ahead and then remove the hardened fat and reheat the roast in the crock pot for several hours. Pour all the liquid into a sauce pan and turn heat to high or medium-high. In a small bowl combine 2/3 cup flour and 2/3 cup water. Whisk until smooth and pour into the liquid as soon as it is boiling. Boil and whisk until thickened. Add 1 teaspoon salt and 1 teaspoon beef base to season, or to taste.

I like cooking the potatoes with the roast because they absorb the juices and become very flavorful, but sometimes I don't put them in and make mashed potatoes separately instead. Either way, it's very good!

Enjoy!

Monday, May 2, 2011

Chap Chae (4 Star)

Yay, a four star dinner recipe! My boys love this meal, although some of them pick out the veggies and only eat the noodles. Does that count? I guess I'm counting it as liking the "meal".

Amazingly, my eldest son ate all of the veggies in his chap chae last night. This was a big deal because he rarely eats veggies. His comment was they didn't taste too different, they mostly added crunch.

These noodles are very fun for kids. They are sweet potato starch noodles (but taste nothing like sweet potatoes--they actually have very little flavor, absorbing whatever flavor is added to them), sometimes called Korean glass noodles. I purchase them at our local Asian market. I've never looked for them at the regular grocery store, so I don't know if they are sold there. But the Asian market is fun! Try it out. (By the way, I have recently discovered that the Asian market is the best place to buy sweet potatoes around here! They have the best kind and they are fresher than the ones at the grocery store.) Nutritionally speaking, I'm not sure how great these noodles are. I think they are a step up from Ramen (what isn't?) and they are gluten free, if that's a concern for you.

Chap Chae is a Korean dish. I used the recipe from Steamy Kitchen. She lists certain vegetables, but really, you can use whatever veggies sound good to you. I used carrots, onions, yellow pepper, green cabbage, spinach, and zucchini this time and it was excellent. The cabbage actually turned out great because I shredded it fairly small and it became a bit translucent and blended with the noodles so the boys who picked out their veggies ended up eating the cabbage, not even noticing. Whatever veggies you use, just stir-fry them to tender crisp and you're good to go. I've also used bits of scrambled eggs in this, with success.

This recipe does have a lot of sugar in it, so I decreased it by half, and we were all thrilled with the flavor.

You can also change the noodle to veggie ratio to fit your liking. I made ours with lots of noodles to compensate for the veggie picker-outers.


Click here for the recipe.

Monday, March 28, 2011

Texas Sheet Cake (4 Star)

I've shared my favorite homemade vanilla cake (here). Now it's time to share my favorite homemade chocolate cake. It is moist, tender, rich, and reminds me of my grandmother. My second-born enjoyed this for his birthday cake, recently.


It is (as the name implies) a sheet cake and so I didn't know if it would work as a different shape but it did. I used a 10 by 2 inch round pan and I baked it 25-30 minutes instead of 20.


This is a recipe that I got from my grandmother's file, but Pioneer Woman has the exact same recipe on her site so I will just link hers so I don't have to type the whole thing. And, of course, her step-by-step format is way nicer than anything I post here.

Click here for the recipe.

Saturday, February 12, 2011

Mississippi Mud Brownies (4 Star)


I can't stop thinking about these brownies. I want to make them every day and eat them all myself. They are fudgy, dense, chewy, and my favorite part is the salty peanut butter on top. Another thing that I like about them is that they are made with cocoa powder, not unsweetened baking squares. It's cheaper that way, easier, and no sacrifice at all in flavor or texture.

I didn't even make them to the full extent of their wickedness because I didn't have marshmallows, pecans, or powdered sugar, but I'm excited for the day that I do. However, they were extremely good with just the chocolate chips and peanut butter.

I was a little unsure about this recipe at first, because it only calls for two tablespoons of cocoa powder in the brownies. I thought that there was no way that was enough but they turned out really good, though they were on the light side of chocolaty. The semi sweet chips added a lot more chocolate. However, if you do want them to have more intense chocolate flavor, then increase the cocoa powder and decrease the flour. I made them once as written in the original recipe and once with more chocolate. Pictured are the more chocolaty ones. I am posting the recipe with my changes.

Mississippi Mud Brownies
adapted from Tasty Kitchen

•1/2 cups All-purpose Flour
•1/3 Cup Unsweetened Cocoa Powder
•1/4 teaspoons Salt
•1/2 cups Unsalted Butter, At Room Temperature
•1 cup White Sugar
•1 teaspoon Pure Vanilla Extract
•2 whole Large Eggs
•3/4 cups Semi-Sweet Chocolate Chips
•1/2 cups Crunchy Peanut Butter (Smooth works fine, too. My favorite is Kirkland Signature's organic peanut butter.)
•2 cups Mini Marshmallows
•1/2 cups Chopped And Toasted Pecans
•2 cups Confectioner's Sugar
•1/8 teaspoons Salt
•4 Tablespoons Unsalted Butter
•2 Tablespoons Unsweetened Cocoa Powder
•1/4 cups Plus 2 Tablespoons Of Milk
•1/4 teaspoons Pure Vanilla Extract

Preheat oven to 350 degrees F. Line an 8×8″ square baking pan with parchment paper or foil. If using foil, spray it with cooking spray.

In medium bowl, combine flour, 1/3 cup cocoa powder, and salt. Set aside.

In large mixing bowl, beat together butter, sugar, and 1 teaspoon vanilla until creamy. Add the eggs one at a time. Stir dry ingredients into batter. Pour batter into prepared pan and spread evenly. Sprinkle with chocolate chips. Bake in preheated oven for 22-25 minutes.

When brownie layer is done baking, gently spread peanut butter over hot brownie. If you use a peanut butter that is thick, you can add a little oil and microwave until it's a little more runny. With mine, I didn't need to do this. Sprinkle the peanut butter covered brownies with marshmallows. Return to oven to bake for 3 more minutes, or until the marshmallows puff. Remove from oven and sprinkle puffed marshmallows with toasted pecans.

To make frosting, combine confectioners sugar and salt. In small saucepan, melt 4 Tablespoons butter over medium heat. When butter is melted, add the 2 Tablespoons of cocoa powder and 1/4 cup of the milk and heat until the mixture begins to boil. Pour this mixture into confectioners sugar/salt mixture and beat on high speed with an electric mixer until smooth and glossy. If frosting is not pourable at this point, add remaining 2 Tablespoons of milk (I didn’t have to do this). Lastly, beat in 1/4 teaspoon vanilla, then pour evenly over puffed marshmallows and pecans.

Let cool completely in refrigerator for 1-2 hours. Cut into squares and enjoy!


Click here for the original recipe.

Tuesday, February 1, 2011

Peanut Butter Butterscotch Cookies (4 Star)

Another one of my goals this year is to eat more cookies. Just kidding! But when I do eat cookies, I want them to be really good cookies. These are really good.

I have been on a peanut butter kick, lately. I don't know why, because I've never cared that much about peanut butter before, but now I just love to eat it, straight out of the jar, even. Or with raisins, (now you might get a little worried about me, but it's good!) or a spoonful of peanut butter with a spoonful of jam, or (this is where I can get out of control) with chocolate chips. I have been trying out many different things, lately, because I just can't seem to get enough of the stuff. One thing that I tried is butterscotch chips with peanut butter. Wow! It sort of reminds me of Reese's Pieces, only way, way better. Anyway, this whole long paragraph is just to explain that when I saw this recipe, I knew I was going to love these cookies. I was right!


Click here for the recipe from Picky Palate.

Friday, January 28, 2011

Mud Balls (4 Star)

This is a treat that all of my kids love. I used to make peanut butter balls when I was a kid (the ones with peanut butter, butter, and powdered sugar) and loved them. This is what I came up with to fulfill my desire for a more healthy (and chocolaty!) peanut butter ball. I usually just wing it on the amounts but this is probably close to what I put in.

Mud Balls

1/2 cup peanut butter (crunchy or creamy--you choose)
1/4 cup honey
1/4 cup unsweetened cocoa powder

Combine the above ingredients--alter amounts, if necessary, to adjust for personal taste and consistency--and roll into balls. If you wanted to get fancy, you could roll them in crushed, roasted peanuts, but my boys don't like fancy.


And, by the way, isn't this the cutest cake plate? My creative sister-in-law, Holli, made it by attaching a pretty cup to the bottom of a pretty plate. I love it.

Wednesday, January 12, 2011

Turkey Gravy (4 Star)

This post is a little late for Thanksgiving, but I think turkey is great now, too. What's better than a little turkey dinner to warm and cheer up January?

I had some left-over cranberry sauce from the cranberry spread that I made for New Year's and since I had an extra turkey in the freezer that I had bought when they were on sale, I decided it was a great time to make a turkey dinner this week.


This is the recipe I have been using for turkey gravy lately and I adapted it from Prudence Pennywise's recipe. Consider it a simplified version. We love this gravy. It has a hint of apple-y sweetness that is so delicious with the savory herbs and drippings.

Turkey Gravy
adapted from Prudence Pennywise's Apple Cider Gravy

drippings of one 12-16 pound turkey
2/3 cup frozen apple juice concentrate
2 1/2 cups water
4-6 teaspoons chicken base (I use Better than Bouillon Organic Chicken Base from Costco)
1 teaspoon dried parsley
1 teaspoon dried sage
1/8 teaspoon nutmeg
additional 1/2 cup water
1/3 cup flour
1-2 teaspoons sea salt (to taste)

Pour turkey drippings into a medium to large saucepan. Add the apple juice concentrate, water, chicken base, and herbs and whisk together. Turn heat up to medium-high. While gravy heats up, put 1/2 cup water and flour into a jar or container with a lid that seals tightly and shake until smooth. When gravy is boiling, pour flour and water mixture in and whisk until thickened. Add salt to taste.

Click here for Prudy's original recipe.

Sunday, January 2, 2011

Breads and Spreads (4 Star)

For the New Year's party that we went to at Brandon's sister's house (which was so very fun, but I forgot my camera--bummer) I made a bread and spread bar. It turned out pretty good, so I thought I'd share.

This almond bread was one I had never made before, out of a book that I recently purchased called "100 Great Breads" by Paul Hollywood. The recipes in it sound really good and the pictures are beautiful, however, so far the ones that I have tried all have something a little questionable about them, such as a lot of salt. This recipe has a lot of salt and next time I make it I will use less because I thought it was too salty. I'm posting this recipe with my changes because I also used a little less flour. I used my bread maker on the dough setting instead of his instructions, so this is how I made it.

Almond Bread
adapted from "100 Great Breads" by Paul Hollywood

3/4 cup milk
1/2 cup water
scant 1/4 cup butter
generous 1/4 cup sugar
2 teaspoons salt
1/2 cup ground almonds
3 1/2 to 3 3/4 cups white bread flour
2 teaspoons active dry yeast
4 oz slivered almonds

Put all ingredients into the bread maker pan in the order listed, except for the slivered almonds. Let the bread maker run the "dough" cycle. Add enough flour to make a smooth dough, but not dry.

After the bread maker "dough" cycle finishes, (it basically mixes briefly, rests, kneads, and rises the dough) add half of the slivered almonds and knead them into the dough. Then cut the dough in half and shape into two loaves. Place on a buttered baking sheet and press the remaining slivered almonds into the tops of the loaves. Let rise for 1 hour.

Preheat the oven to 425 and bake the bread for 20 minutes. Allow to cool on a wire rack.

I loved the almonds in this--they toasted up very nicely. However, they didn't stay on the top of the loaves very well, even though I tried to press them in very firmly. I wonder if they would stay on better with an egg wash, or something.


The spread pictured below is a banana coconut cream spread. I got the recipe from my old American Harvest bread maker recipe book that came with the first bread maker I ever owned (it is now obsolete). This recipe book has some of the most awesome recipes. I am going to post the recipes from this book with slight changes to comply with copyright laws, but I'm pretty sure this book isn't printed anymore, so it would be hard to find. If you ever find one, though, I recommend getting it.

Banana Coconut Cream Spread
adapted from American Harvest bread maker recipe book

8 oz cream cheese
1/4 cup honey
2 Tablespoons mashed banana
2 Tablespoons unsweetened, toasted coconut flakes
1 Tablespoon orange juice concentrate

Beat the above ingredients until light and fluffy. Cover and refrigerate.


The bread pictured below is called Lemon and Orange Bread from "100 Great Breads". This bread also called for a lot of salt which I decreased, and it called for a little rye flour which I didn't have so I subbed whole wheat flour. This recipe also called for a ton of zest. I thought it was too much, but if anyone who tried this bread and reads this blog wants to let me know what you thought, I would love to know. I will post the full amount of zest in the recipe below. Again, I used my bread maker and am posting the instructions for that.

Lemon and Orange Bread
adapted from "100 Great Breads" by Paul Hollywood

1 1/4 cup water
generous 1/4 cup sugar
generous 1/4 cup butter
2 teaspoons salt
2 2/3+ cups white bread flour
scant 1/3 cup whole wheat or rye flour
2 teaspoons active dry yeast
zest of 5 lemons
zest of 6 oranges

Put all ingredients into the bread maker pan except the zest. Begin the "dough" cycle and while the machine does the initial mix, zest the lemons and oranges and then add to the pan. At this point, add a little more flour if the dough gets too sticky.

After the "dough" cycle is complete, divide the dough in half, equally. Butter a baking sheet or two small bread pans. Shape dough into loaves and put in pans. Let rise for 1 hour.

Preheat the oven to 425 degrees and bake for 20 minutes or until golden brown. Cool on a wire rack.


The spread pictured with this bread is cranberry orange spread. It is also from the American Harvest bread maker recipe book. In fact, the rest of the recipes I will post here are from that book.

Cranberry Orange Spread
adapted from American Harvest bread maker recipe book

8 oz cream cheese
1/4 cup whole berry cranberry sauce
1 teaspoon orange juice concentrate
1 teaspoon fresh grated orange peel
2 Tablespoons honey

Combine all ingredients until smooth and creamy. Cover and refrigerate.


Savory Garlic Herb Bread
adapted from American Harvest bread maker recipe book

1 cup water
1/4 cup olive oil
1 Tablespoon sugar
1 teaspoon salt
1 teaspoon dried basil
1 Tablespoon dried minced onions
1 teaspoon garlic powder
3 cups white bread flour
1/3 cup grated Parmesan cheese
2 teaspoons active dry yeast

Put all ingredients into the bread maker pan and run the "dough" cycle. When cycle is finished, remove dough from pan and divide into two equal halves. Shape into loaves and place in two small, greased bread pans. Allow to rise for 20 minutes. Preheat oven to 350 degrees and bake for 25-30 minutes. Cool on a wire rack.


Dilled Mustard Butter
adapted from American Harvest bread maker recipe book

1/2 cup butter, softened
2-3 teaspoons prepared mustard
1/2 teaspoon dried dill weed

Beat together until light and fluffy. Is best for spreading at room temperature, but if you need to store it for a while, then cover and refrigerate.


Rosemary Cheese Spread
adapted from American Harvest bread maker recipe book

3 oz cream cheese
1/2 cup softened butter
1/2 to 1 teaspoon dried rosemary
1/2 teaspoon garlic powder
1/2 cup grated Parmesan cheese
2 Tablespoons finely chopped green onion

Cream the cream cheese and butter together. Add the remaining ingredients and beat until well mixed. Is best for spreading at room temperature, but if you need to store it for a while, then cover and refrigerate.


Cinnamon Raisin Bread
adapted from American Harvest bread maker recipe book

1 1/4 cups water
2 Tablespoons powdered milk
2 Tablespoons butter
2 Tablespoons sugar
1 1/2 teaspoons salt
2 teaspoons cinnamon
3 cups white bread flour
3 teaspoons active dry yeast
1/2 cup raisins

Put all ingredients into the bread maker pan except the raisins. Run the "dough" cycle. When complete, add the raisins and knead into the dough. Divide the dough into two equal halves. Shape into loaves and place into two small, greased bread pans. Allow to rise for 20 minutes. Preheat oven to 350 degrees and bake for 25-30 minutes. Cool on a wire rack.


Cinnamon Honey Butter
adapted from American Harvest bread maker recipe book

1/2 cup softened butter
1/4 cup honey
1 teaspoon ground cinnamon

Beat all ingredients together until fluffy. Is best for spreading at room temperature, but if you need to store it for a while, then cover and refrigerate.


I also made French bread which is not pictured, but I have already posted a recipe here.

I made all of the loaves small so that they would be an ideal portion size for party trays and I think I could have even gone smaller. It was fun to try different combinations of the breads and spreads. In spite of concerns I had with some of the breads, they were all moist, chewy, and delicious.

Sunday, December 26, 2010

Truffles (4 Star)

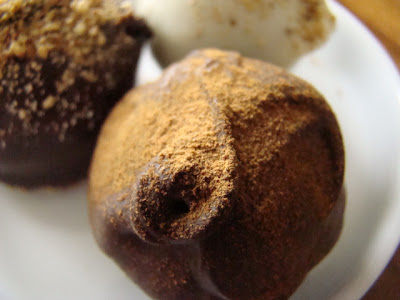
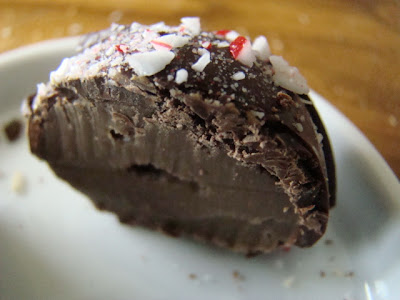
I made truffles again this year (see this post for last year's info--recipes used, tempering, etc.). I did mostly the same thing, but I also tried something new. I'll tell you at the end of this post because I am saving the best for last.

Here are the combinations I made:

Milk chocolate center, dark chocolate coating, finely shredded, toasted coconut (unsweetened) on top:


Dark chocolate center, white chocolate coating, finely chopped, toasted almonds on top:


Cinnamon center (I used Hershey's cinnamon chips), dark chocolate coating, topped with cinnamon:


Butterscotch center (I used Guittard butterscotch chips), dark chocolate coating, topped with finely chopped, toasted almonds:


Mint center (I used Hershey's mint chips), dark chocolate coating, topped with crushed candy cane:


Mint center, white chocolate coating, topped with crushed candy cane:


The mint truffles were my second favorite. But my absolute-favorite-new-obsession-in-truffles-and-don't-even-care-if-I-ever-make-or-eat-any-of-the-others-ever-again (except the mint, of course) are these peanut butter truffles. Wow, they were so creamy, perfectly peanut buttery and chocolatey. If you like Reese's Peanut Butter Cups, these are ten times better.


I made two batches because I made the first batch incorrectly--I didn't read the recipe very carefully. Instead of first mixing the melted white chocolate and peanut butter together and then adding the cream I just dumped it all together and mixed. It didn't work very well because the white chocolate lumped together and wouldn't smooth out. I heated the whole mess up a little in an effort to smooth out the chocolate and it worked, but then the whole thing seemed greasy. Some of the oils separated out. However, it was still usable after being chilled, so I coated these with dark chocolate so that I could tell what was inside, and I topped them with roasted, salted, crushed peanuts. You can see this first batch pictured below. The middle is fairly compact and dense.


I made them a second time, this time following the instructions, and they were so creamy, dreamy, smooth, and fabulous. You can see in the picture below that they are a lot more fluffy than the truffles above.


Click here for the peanut butter truffle recipe.
Click here for the Pioneer Woman's truffle recipe (I used it for all the other centers).

Here are some things I plan to do next year:

=I'm going to chop the nut toppings in bigger chunks.
=I'm going to try mixing more coarsely chopped nuts into some of the fillings.
=I'm going to try mixing some fruits like dried cranberries into some of the fillings.

Any other ideas?

Sunday, December 19, 2010

Sunshine Golden Yellow Cake (4 Star)

I really like cake. Especially this cake. It is moist and fluffy and so far, my absolute favorite vanilla cake.


This recipe is from an old cook book of my mom's and I don't even know the name. But it's very old. Maybe it was my grandmother's to begin with. I've got to take a closer look at it the next time I visit.

I used to love making this cake when I was a child. Before I left home to go to college I copied down all of my mom's recipes onto 3 by 5 note cards that I wanted to take with me and this was one. I still love making it, but now I try to practice some restraint.

Isn't it lovely?


You want to know a secret? Most cake recipes that I have seen (probably this one included--though I don't have the book with me to check it out for sure--I didn't copy it word for word) instruct you to cool the cake before frosting it. Well, if you want a real treat, try frosting your cake when it is still warm, using homemade buttercream frosting. It may not be as beautiful to look at, but it will taste amazing because some of the frosting will melt and be absorbed into the cake like butter on warm bread. I can hardly write of it without jumping up and making this cake!


Sunshine Golden Yellow Cake

Makes one 13 by 9 by 2 inch or 2 9-inch rounds.

Grease and flour pans and preheat oven to 350 degrees.

2 1/2 cups flour
1 1/2 cups sugar
3 1/2 teaspoons baking powder
1/2 teaspoon salt
3/4 cups milk
2/3 cup butter, softened (The original recipe calls for shortening, but who really wants to eat that? Blech. I think this recipe works fantastically with butter.)
3 eggs
1/2 cup milk
1 teaspoon vanilla

Sift the dry ingredients together.

Add the 3/4 cup milk and the softened butter and cut together until combined and then beat for two minutes. The batter will be fairly stiff at this point but will become smooth and creamy.

Add the eggs, remaining milk, and vanilla and beat again for two minutes. The batter will become very fluffy.

Pour batter into greased and floured pan(s) and bake in the preheated oven for 30-40 minutes if using a 9 by 13 inch pan or 25-35 minutes if using 9 inch rounds. Cake is ready when it springs back to the touch or a toothpick inserted into the center comes out clean.

Cool and frost as desired (if you want it to look nice), or only cool until cake is still very warm and frost as desired (if you want it to taste even more amazing than it already does).

Saturday, December 4, 2010

Play Dough Cookies (4 Star)

These cookies are so fun for kids to help make. They are very easy to mix up, as easy to work with as play dough, and they hold their shape fairly well when baked. Although some of my boys were not so thrilled with them, saying they lacked flavor, which I agreed with. Next time I make them I think I will experiment--maybe more or different flavorings, lemon or orange zest, crushed candy cane, or something like that.


They did like the ones with chocolate chips and sprinkles. I think I should have mixed crushed candy canes into the candy cane cookies or even sprinkled them on top. They were still eaten quickly, though.


This is a basic butter cookie recipe from Prudence Pennywise. Click here to view.

Tuesday, November 30, 2010

Deluxe Pumpkin Pie (4 Star)


It is time to say goodbye to the Thanksgiving pies, until next year. (Sniff.) This is the last pie I that I made. I made it on a whim because I had all my other pies made, but I had one more pie pan and some left-over crust--just enough for one more pie, and I decided I couldn't let it go to waste. I had seen this recipe and I had all the ingredients for it except for the gingersnaps for the gingersnap streusel topping, so I made a different topping. When I make this again, I will be sure to get the gingersnaps, because I think that would be even better than the streusel that I improvised.


This pie turned out really good, though not as popular as the regular pumpkin pies. (Of course not! Nothing can take the place of regular pumpkin pie--unless it's butternut squash pie:) It was much more rich and the pumpkin was less conspicuous with the other flavors, but the flavors were delicious together.


The original recipe was for mini pies, so I altered it to make one big pie. And the name was too long, so I shortened it. When people asked what kind of pie it was, I didn't want to have to say, "Cream Cheese and Butterscotch Pumpkin Pie with Ginger Streusel Topping." So here it is:

Deluxe Pumpkin Pie
(makes one pie)

1 unbaked 9-9.5 inch pie shell

Cream Cheese Layer
8 oz. softened cream cheese
1/3 cup granulated sugar
1 teaspoon vanilla

1/2 cup butterscotch chips

Pumpkin Filling
1/4 cup granulated sugar
1/4 cup brown sugar
2 eggs
1/2+ teaspoon cinnamon
1/2+ teaspoon nutmeg
pinch cloves
pinch ginger
pinch salt
1/2+ teaspoon vanilla
1/2 cup half and half or cream
1 cup canned or fresh pumpkin

Streusel Topping
1/2 cup all purpose flour
1/4 cup brown sugar
1/4 Cup chopped pecans
3/4 teaspoon ground ginger
1/4 cup softened butter

Preheat the oven to 350 degrees.

In a mixing bowl, beat the cream cheese, sugar, and vanilla until creamy. Spread on the bottom of the pie shell. Sprinkle the butterscotch chips in an even layer on top of the cream cheese.

Clean out the mixing bowl and beat the sugars, eggs, spices, salt, and vanilla on high speed until fluffy and stiff. Add the half and half or cream and the pumpkin and mix until well combined. Pour on top of the cream cheese and butterscotch chips.

Put the pie in preheated oven and set timer for 50 minutes. While baking, clean out the mixing bowl and combine all of the streusel ingredients except the butter. Mix until combined. Cut in the butter until it resembles coarse crumbs. After the pie has baked for about 50 minutes or until the filling is beginning to set, remove the pie from the oven and allow the filling to set for 10 minutes. Sprinkle the streusel on top and return to the oven and bake for another 25 minutes, until the pie is completely set and the streusel is golden. Remove from the oven and allow to cool completely before serving.


Thanks to Picky Palate and Prudence Pennywise for the original recipes. Click here and here to view.