Sunday, December 26, 2010

Truffles (4 Star)

I made truffles again this year (see this post for last year's info--recipes used, tempering, etc.). I did mostly the same thing, but I also tried something new. I'll tell you at the end of this post because I am saving the best for last.

Here are the combinations I made:

Milk chocolate center, dark chocolate coating, finely shredded, toasted coconut (unsweetened) on top:


Dark chocolate center, white chocolate coating, finely chopped, toasted almonds on top:


Cinnamon center (I used Hershey's cinnamon chips), dark chocolate coating, topped with cinnamon:
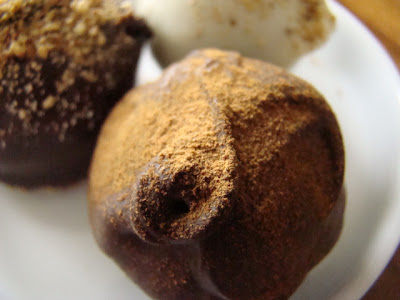


Butterscotch center (I used Guittard butterscotch chips), dark chocolate coating, topped with finely chopped, toasted almonds:


Mint center (I used Hershey's mint chips), dark chocolate coating, topped with crushed candy cane:
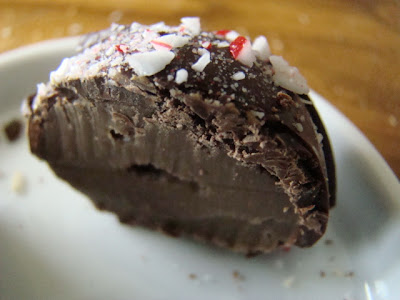


Mint center, white chocolate coating, topped with crushed candy cane:


The mint truffles were my second favorite. But my absolute-favorite-new-obsession-in-truffles-and-don't-even-care-if-I-ever-make-or-eat-any-of-the-others-ever-again (except the mint, of course) are these peanut butter truffles. Wow, they were so creamy, perfectly peanut buttery and chocolatey. If you like Reese's Peanut Butter Cups, these are ten times better.


I made two batches because I made the first batch incorrectly--I didn't read the recipe very carefully. Instead of first mixing the melted white chocolate and peanut butter together and then adding the cream I just dumped it all together and mixed. It didn't work very well because the white chocolate lumped together and wouldn't smooth out. I heated the whole mess up a little in an effort to smooth out the chocolate and it worked, but then the whole thing seemed greasy. Some of the oils separated out. However, it was still usable after being chilled, so I coated these with dark chocolate so that I could tell what was inside, and I topped them with roasted, salted, crushed peanuts. You can see this first batch pictured below. The middle is fairly compact and dense.


I made them a second time, this time following the instructions, and they were so creamy, dreamy, smooth, and fabulous. You can see in the picture below that they are a lot more fluffy than the truffles above.


Click here for the peanut butter truffle recipe.
Click here for the Pioneer Woman's truffle recipe (I used it for all the other centers).

Here are some things I plan to do next year:

=I'm going to chop the nut toppings in bigger chunks.
=I'm going to try mixing more coarsely chopped nuts into some of the fillings.
=I'm going to try mixing some fruits like dried cranberries into some of the fillings.

Any other ideas?

Sunday, December 19, 2010

Sunshine Golden Yellow Cake (4 Star)

I really like cake. Especially this cake. It is moist and fluffy and so far, my absolute favorite vanilla cake.


This recipe is from an old cook book of my mom's and I don't even know the name. But it's very old. Maybe it was my grandmother's to begin with. I've got to take a closer look at it the next time I visit.

I used to love making this cake when I was a child. Before I left home to go to college I copied down all of my mom's recipes onto 3 by 5 note cards that I wanted to take with me and this was one. I still love making it, but now I try to practice some restraint.

Isn't it lovely?


You want to know a secret? Most cake recipes that I have seen (probably this one included--though I don't have the book with me to check it out for sure--I didn't copy it word for word) instruct you to cool the cake before frosting it. Well, if you want a real treat, try frosting your cake when it is still warm, using homemade buttercream frosting. It may not be as beautiful to look at, but it will taste amazing because some of the frosting will melt and be absorbed into the cake like butter on warm bread. I can hardly write of it without jumping up and making this cake!


Sunshine Golden Yellow Cake

Makes one 13 by 9 by 2 inch or 2 9-inch rounds.

Grease and flour pans and preheat oven to 350 degrees.

2 1/2 cups flour
1 1/2 cups sugar
3 1/2 teaspoons baking powder
1/2 teaspoon salt
3/4 cups milk
2/3 cup butter, softened (The original recipe calls for shortening, but who really wants to eat that? Blech. I think this recipe works fantastically with butter.)
3 eggs
1/2 cup milk
1 teaspoon vanilla

Sift the dry ingredients together.

Add the 3/4 cup milk and the softened butter and cut together until combined and then beat for two minutes. The batter will be fairly stiff at this point but will become smooth and creamy.

Add the eggs, remaining milk, and vanilla and beat again for two minutes. The batter will become very fluffy.

Pour batter into greased and floured pan(s) and bake in the preheated oven for 30-40 minutes if using a 9 by 13 inch pan or 25-35 minutes if using 9 inch rounds. Cake is ready when it springs back to the touch or a toothpick inserted into the center comes out clean.

Cool and frost as desired (if you want it to look nice), or only cool until cake is still very warm and frost as desired (if you want it to taste even more amazing than it already does).

Saturday, December 4, 2010

Play Dough Cookies (4 Star)

These cookies are so fun for kids to help make. They are very easy to mix up, as easy to work with as play dough, and they hold their shape fairly well when baked. Although some of my boys were not so thrilled with them, saying they lacked flavor, which I agreed with. Next time I make them I think I will experiment--maybe more or different flavorings, lemon or orange zest, crushed candy cane, or something like that.


They did like the ones with chocolate chips and sprinkles. I think I should have mixed crushed candy canes into the candy cane cookies or even sprinkled them on top. They were still eaten quickly, though.


This is a basic butter cookie recipe from Prudence Pennywise. Click here to view.

Thursday, December 2, 2010

Candied Sweet Potatoes

There are two types of people in this world--those who like sweet potatoes, and those who don't. I feel sorry for the little lives of those who don't. I have assisted some to see the light. Maybe this post will help others.

To begin with, I must make sure that there is no confusion regarding yams and sweet potatoes. Yams are not sweet potatoes. If anyone tries to tell you otherwise, run the other direction. Yams = yuck. Sweet potatoes = fabulousness. In the store, if the sign says "yams" they are not sweet potatoes, they are yams. Do not touch them. If the sign says sweet potatoes, they are sweet potatoes. Buy them. Got it?

Candied sweet potatoes are my signature Thanksgiving dish. Mainly because everybody else thinks they don't like them and no one wants to eat them, let alone make them. But I love them and I must have them so I always make them for Thanksgiving. However, I have found that usually people think they don't like them because what they have had in the past and didn't like were actually yams. And if they were mashed up yams, the dislike will probably be even more intense. But in my family, while initially my sweet potatoes were eyed with mistrust and possibly revulsion, they are now a very popular dish. In fact, my sweet potatoes reached another milestone this year. My Dad, who is notorious for his picky eating, accidentally ate my sweet potatoes, not knowing what they were. His verdict was, "They weren't horrible." Coming from my Dad, that is a huge compliment.

Candied sweet potatoes are one of those dishes that is very similar to dessert but is served with dinner. I really like that kind of dish. This is why, as you may notice, there is a sea of toasted marshmallows on top. Toasted marshmallows are an excellent compliment to sweet potatoes. As are brown sugar, butter, and nuts. Give them a try--you may find out that they aren't horrible.


I never measure, so these are guesstimates. It's all to taste, anyway.

Candied Sweet Potatoes

about 3 lbs sweet potatoes (not yams!)
2-4 Tablespoons cold butter
1/4-1/2 cup brown sugar
1/2 cup chopped walnuts or pecans
1/2-1 cup mini marshmallows

Boil the sweet potatoes whole and unpeeled in a saucepan for about 15-20 minutes or until tender all the way through. Test with a fork. When done, rinse potatoes in cold water until cool enough to handle.

Preheat the oven to 350 degrees. Butter a 1 1/2 quart baking dish.

Peel the sweet potatoes and slice into 1/4-1/2 inch thick discs. Spread a layer of about 1/3 of the potatoes in the bottom of the baking dish. Sprinkle 1/3 of the nuts over the potatoes. Cut little slices of the butter and dot the potatoes and nuts. Sprinkle a Tablespoon or two of brown sugar on top. Repeat the layers so that you have three layers of sweet potatoes, nuts, butter, and sugar.

Cover the baking dish with a lid or foil and bake for 20-30 minutes, until sugar is caramelized. Remove dish from the oven, remove the lid or foil, and sprinkle the top with the marshmallows. Increase the oven heat to 450 degrees and brown the marshmallows for 2 minutes or until puffed up and golden. Check frequently to avoid burning. Serve immediately.

Cranberry Sauce (0 Star)

Homemade cranberry sauce is very easy to make and so flavorful. And beautiful. The gorgeous red color and the sweet-tart taste to complement the turkey is a Thanksgiving delight.


This recipe is also versatile. You can experiment with different flavors of juice, citrus zest, and different sweeteners. You can make it as sweet or as tart as you'd like. I used Pioneer Woman's recipe as a starting point but I didn't have maple syrup (though I'd like to try it that way). Here is what I did:

Cranberry Sauce

12 oz cranberries (one package)
1/2 cup frozen orange juice concentrate
1/2 cup water
2/3 cup brown sugar

Wash the cranberries under cold water and put into a medium saucepan. Add the rest of the ingredients and then stir. Turn heat to high and cook until it boils. Then turn the heat down to medium or medium low and simmer for about 10 minutes or until thickened. Remove from heat and cool completely before serving. Store in the refrigerator.

Click here for Pioneer Woman's recipe.